
Este quilt lo hice con el método de reverse applique. Es bastante sencillo y da un aspecto muy lindo y distintivo. Esto es lo que yo hice:
I made this quilt using the reverse applique method. It's very simple and looks really nice and distinctive. This is what i did.
 Necesitas: 1 cuadrado de 5 " (tela A) (yo usé cuadrados precortados"charm pack")
1 cuadrado de 6 1/2" (tela B)
molde o plantilla circular de aproximadamente 4 1/2 ", yo usé este molde redondo para cortar galletas.
you need:
1- 5" square (fabric A) (i used charm square)
1 - 6 1/2" square (fabric B)
a 4 1/2" circle template, i used this cookie cutter round
y aquí vamos!!
and here we go!
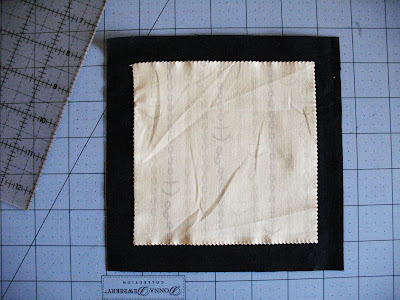
El cuadrado de la tela A se pone al centro del cuadrado de la tela B, ambos con los lados derechos hacia abajo. La puedes prender con un alfiler.
Layer the fabric A square center on top of fabric B square, righ sides facing down. You can pin together.
Centra el círculo sobre el cuadrado A y dibújalo con lapiz, pluma o marcador.
Center the circle on square A and trace it with pencil, pen, or markers.


 Ahora y con cuidado se corta la tela B para mostrar la tela A. Para ello tienes que separar las capas, tomando ambas telas de en medio del círculo y separalas y haz un pequeño corte justo en el centro de la tela B. Now and carefully it's time tu cut the fabric B to show the fabric A. You pull the layers apart in the middle of circle and in the center of fabric B make a little cut.
 A partir de ese pequeño corte y usando el círculo como guía, corta líneas hacia el centro, como haciendo un asterisco, teniendo cuidado de conservar un límite espacio de 1/4" de la puntada. Haciendo esto es más fácil recortar todo el círculo sin cometer errores!
 Ahora corta el círculo usando la puntada como guía (recuerda respetar siempre el margen de 1/4" hacia la puntada.
Cose sobre la línea que dibujaste y cuando completes el círculo, asegúrate de que cosiste el punto de inicio de la puntadas, por lo que es bueno que te pases un poco, a manera de refuerzo.
Sew along the circle outline you traced. As you complete the circle, be sure to sew past your start point, so you can sew a little more only to scure both edges of you stitch.
Ahora y con cuidado se corta la tela B para mostrar la tela A. Para ello tienes que separar las capas, tomando ambas telas de en medio del círculo y separalas y haz un pequeño corte justo en el centro de la tela B. Now and carefully it's time tu cut the fabric B to show the fabric A. You pull the layers apart in the middle of circle and in the center of fabric B make a little cut. A partir de ese pequeño corte y usando el círculo como guía, corta líneas hacia el centro, como haciendo un asterisco, teniendo cuidado de conservar un límite espacio de 1/4" de la puntada. Haciendo esto es más fácil recortar todo el círculo sin cometer errores!From that small cut and using the circle as a guide, short lines toward the center, as doing an asterisk, make sure cut away 1/4" from the stitched line. doing this is more easy cut all circle without mistakes!
Ahora corta el círculo usando la puntada como guía (recuerda respetar siempre el margen de 1/4" hacia la puntada.Now cut the circle using the stitch as a guide (always remember respect the limit of 1/4" to stitch).
 Por el reverso de los cuadrados, corta el exceso de la A, tratando de dejar siempre un margen de 1/4" de la linea de la puntada.
 fue fácil no crees? ...y puede ser adictivo...!!
Por el reverso de los cuadrados, corta el exceso de la A, tratando de dejar siempre un margen de 1/4" de la linea de la puntada. On the wrong side of the squares, trim away the excess of fabric A, always away 1/4" from the stitch line.
Y ahora ya tienes tu bloque con reverse applique!!
and now you have your reverse applique block!!
fue fácil no crees? ...y puede ser adictivo...!!it was easy, don't you? ... and can be addictive ...!!


Espero que este pequeño tutorial haya sido útil, pero si tienes alguna duda o no quedó claro el método que usé, por favor no dudes con contactarlo y haré lo posible para explicarlo mejor!
I hope this little tutorial has been helpful, but if you have any doubt or wasn't clear the method i used, please contact me and i'll the best to explain it better!
This is great! I've seen another where you pull it through by adding stablizer.
ResponderEliminarThanks for the tutorial! This is a really interesting technique
ResponderEliminarthanks for the tutorial. it looks like a fun technique to try!
ResponderEliminargreat tutorial! this is one thing I haven't done yet! another first! ;-)
ResponderEliminarfun blog you have! Mucho gracias!
Great quilt!
ResponderEliminarabsolutely beautiful!
ResponderEliminarfantastic quilt, I really need to give this a try. I looks right up the alley of the Alabama Stitch Book.
ResponderEliminarGreat quilt! Thanks for the tutorial!
ResponderEliminarTe quedó divino! Creo que voy a usar mi pack de charms de telas japonesas!
ResponderEliminarthis quilt is wonderful!
ResponderEliminarTe ha quedado precioso, y un buen tutorial.
ResponderEliminarEnhorabuena !!!
Me hago seguidora de tu blog porque me encantan las ideas que tienes :)